
Steam is the ultimate online platform for playing, buying, creating and discussing PC games. This gaming platform hosts thousands of games and is currently one of the favorite destinations of gamers.
To take a screenshot of the ongoing game in Steam games, you need to press the F12 key that is quite known to all users by now. However, the dilemma lies in where these Steam screenshots are being saved. This is one of the top queries received by us: Where are Steam screenshots saved? But don’t worry! In this article, we have gathered all the information for you in relation to the Steam games, with our main focus on Steam screenshots and how to download them, please keep reading.
So, let’s dive into the main content:

Where are Steam screenshots saved
To begin with, we will first provide an answer to your question, where are Steam screenshots saved? When you press F12 Key while playing Steam games, it takes the screenshot of your screen and automatically saves it on your PC.
To find your saved Steam screenshots you first need to access the Steam screenshot folder. You can access the Steam screenshot folder via three effective methods.
Also Read:
- How to remove dropbox from Mac
- 11 Best Voicemail App for Android 2020
- How to Enable Screen Share on Discord Server
Method 1: Access the Steam Screenshot Folder on your Hard Disk directly
Every Steam user has its own screenshot folder in their PC in which all the snapped screenshots while playing games get saved. The exact location of the screenshot folder on your PC is the same where Steam is currently installed; however, the default location is of course in Local Disk C. Therefore, the first way to access the Steam screenshot folder is to check them manually on your Hard Disk directly.
Here are some of the default locations generally available:
- C:\Program Files (x86)\Steam on Windows 8 and Windows 10
- Users/{username}/Library/Application Support/Steam on Mac
- ~/.local/share/Steam on Linux system
Now, let’s have a quick look at the steps:
Step 1: Open windows ‘File Explorer’ or ‘This PC’ on your computer
Step 2: To open the Steam screenshots, change the <yourSteamID> and <app – ID> to your own and follow:
C:\Program files (x86)\Steam\userdata\<yourSteamID>\760\remote\<app – ID>\screenshots.
Note: For users who are aware of their SteamID, they can follow these steps:
Step 1: Launch your Steam client > Go to the top menu and Click on ‘View’ > ‘Settings’ > ‘Interface’
Step 2: A box written “Display Steam URL address when available’ is displayed. Click Ok to save.
Step 3: Go to your Steam profile name, choose ‘View my Profile’. The long-form number given at the end of the displayed URL is your SteamID.
This method is effective in saving your time from launching Steam.
Method 2: Access Steam screenshots using Steam Screenshot Manager
The second method to access the Steam Screenshot Folder is via using the Steam screenshot manager. Steam client has the in-built Screenshot manager which you can use to look for the saved screenshots on Steam. It also lets you upload or delete the Steam screenshots at ease.
Just follow the given detailed steps on how to access the Steam screenshot folder:
Step 1: Launch the Steam program on your PC. Then go to the upper left corner of the Steam screen and click on ‘View’
Step 2: You will get a drop-down menu; from there you click on the ‘Screenshots’ option
Step 3: Once done, the Steam Screenshot Manager will appear that displays all your Steam screenshots so you can access them from here.
Step 4: To view the Steam screenshot folder locally saved on your hard drive, you can click on ‘Show on Disk’ button
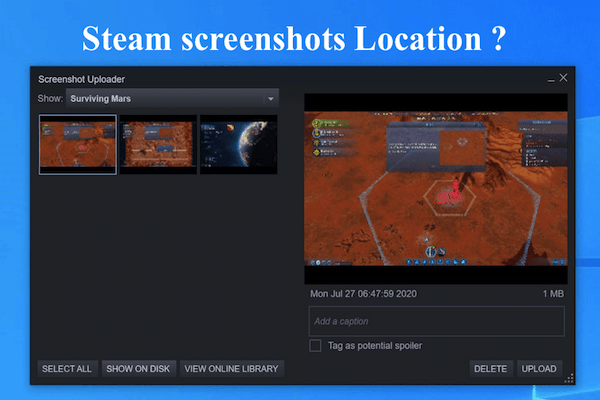
Method 3: Find your Steam screenshots using the Screenshot Uploader tool
The Screenshot Uploader tool is a great program to help you get an idea of what and how many screenshots you have on your PC. Each screenshots are categorised by their game through the drop-down menu in the top-right corner of the screen. You can click on the game to see the snapped screenshots. Further, the tool lets you upload the screenshots to the cloud for safekeeping to be prepared against unforeseen events of hard drive failure. To create backup, just select the screenshots and click on ‘Upload’ and you are done, voila!
Method 4: Use Steam Community Link
If you have tried all the above methods and are still unable to find the location of your saved screenshots, then simply just click on below given Steam Community link-
http://Steamcommunity.com/my/screenshots/
The link will direct you straight to the exact location of your Steam screenshots. It is always kept updated and will also keep you updated if there is change in Steam location by automatically linking above link to your Screenshots location.
How to download Steam screenshots
Now that you are familiar with the location where all your Steam screenshots get saved, you might be curious on how to download Steam screenshots? and share it with your friends.
Well, if you took the Screenshots while playing games on Steam, then those screenshots are obviously already available on your computer. You just need to find them and above guide is sufficient to help to do that. Still to sum it up, please follow below listed steps:
Step 1: Go to the menu ‘View’ and then click on ‘Screenshots’
Step 2: Find your game from the list of options there and click on it to see the Steam screenshots
Step 3: Select any of the Screenshot and choose ‘Show on Disk’. Once done, this will display a Windows Explorer window where all the screenshots are getting stored. Now, it is easier for you to copy the files from this location and paste it elsewhere for easier access.
Additionally, the above-mentioned Screenshot Uploader tool is helpful in downloading Steam screenshots via uploading them on cloud as backup.
Concluding Remarks
Enjoying Steam games is really rewarding especially when you keep screenshots of your achievements. But from aforesaid discussion, it is evident that even though Steam screenshots are easy to snap, it is not so intuitive to find their saved location and download them.
This article was an attempt to help you breakthrough that and hopefully answers to your questions were answered here in an informative way. Please don’t forget to share this article.
Also Read:
- How to Get Reset Windows Protection Recovery Key
- How to Change Gmail Recovery Email Address in Very Easy Step
- 11 Best Free Macro Recorders For Windows , Mac Huge List
- Cell Phone Signal Booster do they work in Rural Areas
- How to fix Minecraft Process crashed with exit code 805306369
- How to Skip ads or block Ads on Hulu