
The history of the screenshots
In earlier stages of computing there was always the chance to send immediate information to persons in distance using the Print Screen feature. Chinese people say that an image is worth of a thousand words and this is an absolute reality for the computer era.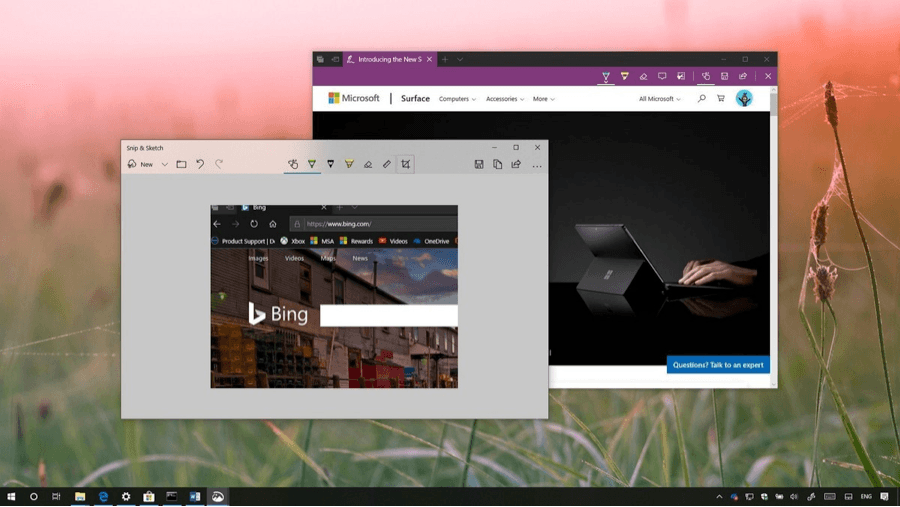
The question on how to take a screenshot on windows is an easy one and modern computer manufacturers have finally found a way to make it easier for you to perform all these simple tasks.
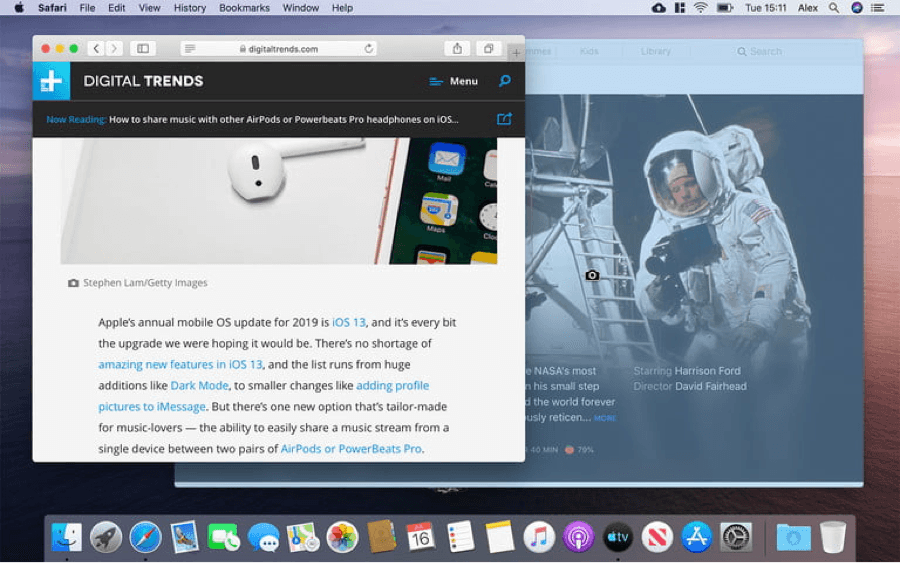
First, the screenshots are direct photographs and copies of what you are seeing in your screen either computer or smartphones. These copies are sometimes easier to share because of the immediate speed of action and of course the accuracy of the information sent.
On the other hand, the screenshots are not disputed by any means. There is zero chance you can manipulate a screenshot to fix it the way you want or misuse the information given there.
Also Read:
- Best Funny Cool WhatsApp Status Quote
- Funny Instagram Captions For Selfies
- HD Wallpapers For Mobile Wallpaper
- Free Movie Apps For Android & IOS
Screenshots when using a windows computer
Modern operating systems such as the Windows 10 have ready to use solutions so that you can easily take and share screenshots at any given time. You can easily take a screenshot on virtually any platform while using Windows and the philosophy is almost the same for all applications.
The latest version of Windows has an in-built option working smoothly for basic tasks, but there are also many third parties’ applications which can give you more precise use and greater features.
There are multiple ways to take a screenshot in Windows 10. You can simply press the Print Screen button on your keyboard, take a screenshot and save it to your clipboard as a file.
There are multiple names you can find on the keyboard for the Print Screen feature, but the most common ones are the “PrnScn” and the “Print Scr” which are unanimous across the world no matter what the basic language of the user is.
You can find the button between the F12 and the Scroll Lock on the desktop computers. In the laptop computers there is a slight variation. You may have to press the function (Fn) button so that you can access the Print Screen feature.
Sometimes when pressing the function key chances are that nothing happens but the information is well kept inside the clipboard memory of your computer.
To save your screenshot as a file then you need to follow a slightly different procedure. You have to press the windows logo key with the print screen key you can easily see on the keyboard.
Just in case you are using a tablet with Windows mobile version you simply need to press the Windows logo key as well as the volume down button simultaneously.
As you may have understood there is no confusion on how to take a screenshot on windows 10. The same applies for the question on how to take a screenshot on windows 8, which is a rather simple procedure for all people involved.
Older versions of Windows operating system are also great in delivering precise screenshots that are ready to spread the information where you want to give it.
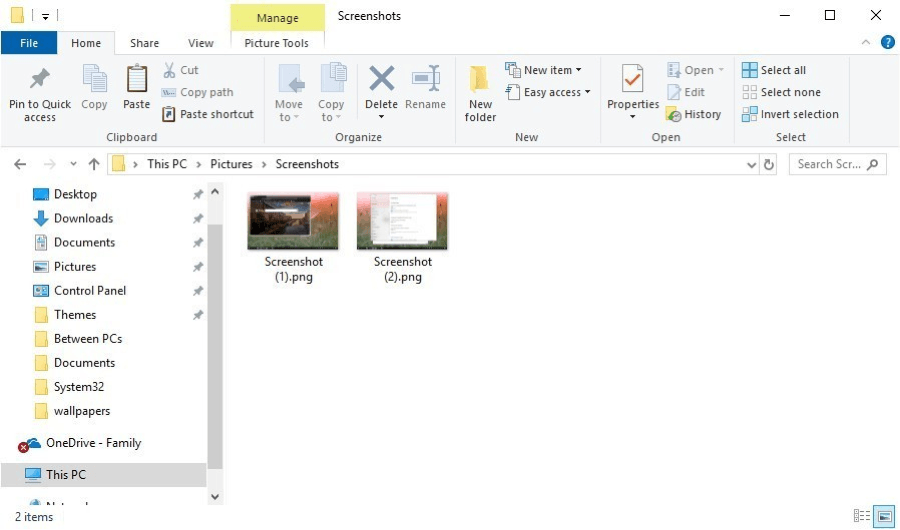
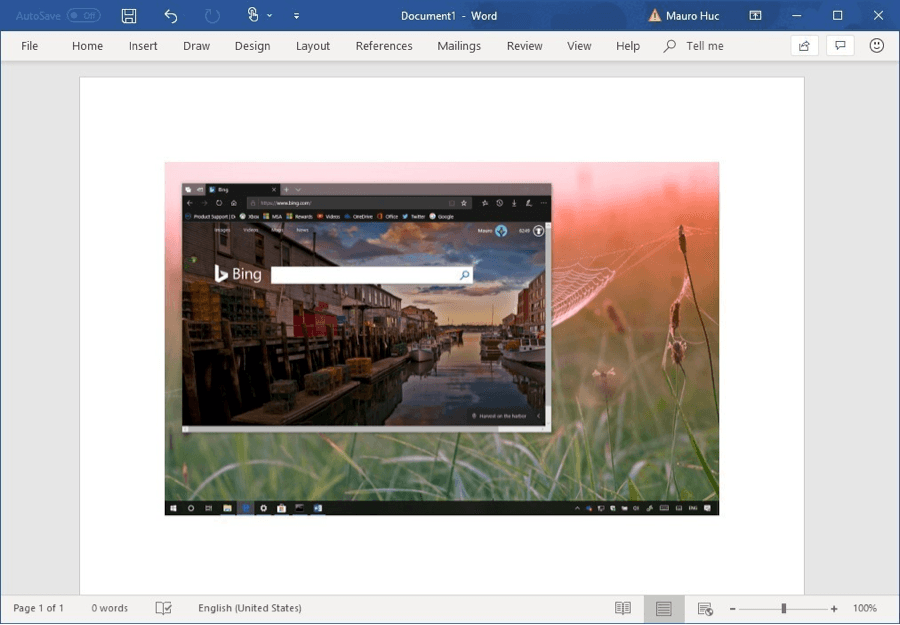
When you still have the screenshot in your clipboard you will see your screen be dimmed for a little while. Then the screenshot will appear as a file in a folder that is named “Screenshots” inside a bigger folder called “Pictures”.
The computer labels the screenshot with a serial number that comes up when you are taking more screenshots.
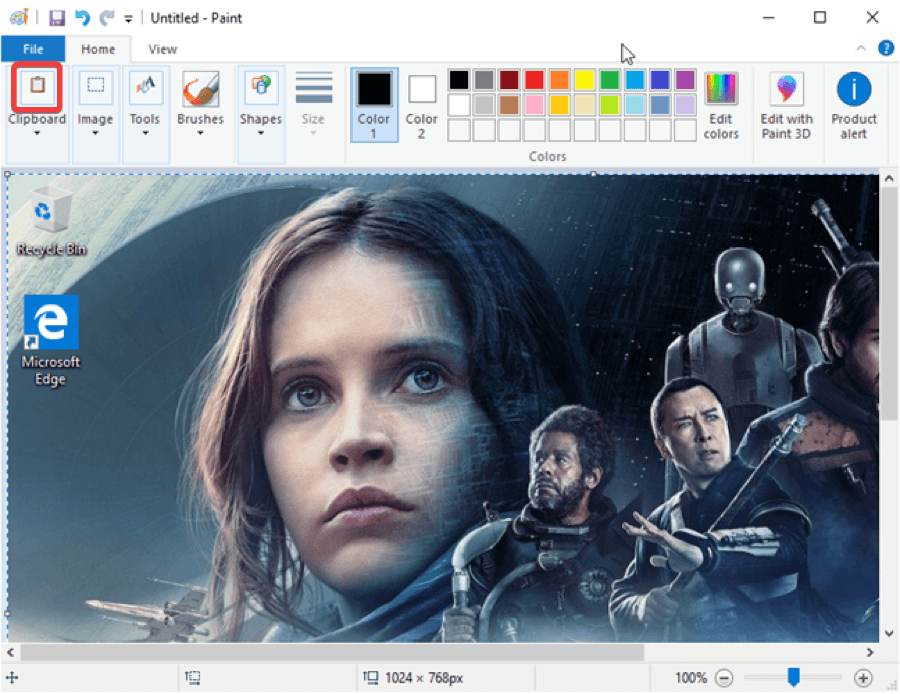
There is also the chance to take a screenshot without saving it to your PC folders. The very first action is to press the Print Screen button. Now the shot of your choice is copied to the clipboard short memory.
This is the answer to give if asked about how to take a screenshot on windows 7
which were constantly in lack of memory and needed special care to take more screenshots when needed.
If you want to save the screenshot in a separate word file, then you need simply to copy and paste it inside the word pending cursor. This is all you need then trying to get the best out of your screenshots while being in a pure Windows environment.
Things become simpler with Windows phones that are mostly functioned thorough the central screen button and the volume ones. In these smartphones the general rules are to press the central button to capture the screenshot and seconds later press the lateral button from the two being in the side of the phone controlling the voice.
You are going to have your screenshot saved in the items folder inside your phone. Then you can submit it to the right recipients using either your e-mail of the social media.
Also Read:
- 12 Best Free Beat Making Software
- Best Recording Software For Games
- Top 11 Software For Free Photoshop Alternatives
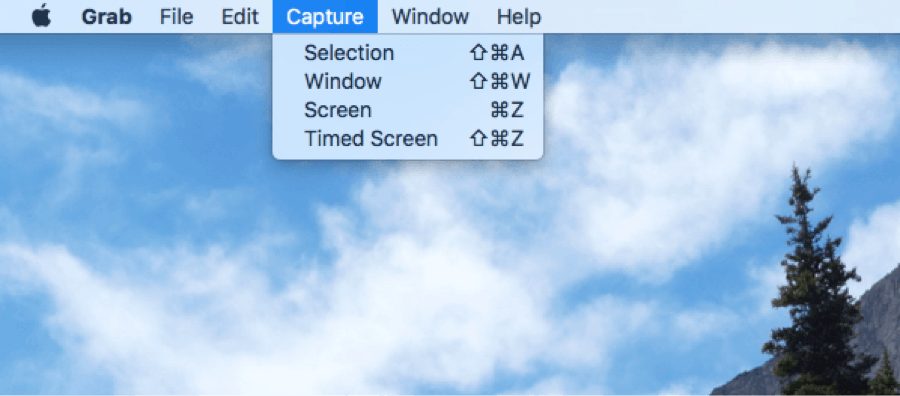
How to get a screenshot while being in Mac environment
There are several ways to get screenshots when you are being in a Mac environment. No matter if these computers are different from the normal PCs, they all use the same strategy to capture and store the valuable screenshots that you may have been asking from your friends and colleagues.
If you are working with a Mac there are three different keyboard shortcuts that you definitely need to know before taking screenshots. Two of them are being around for a long time but the third one has been recently added to the registered ways you can provide a screenshot to your clipboard and store it safely to your memory card or hard disk drive.
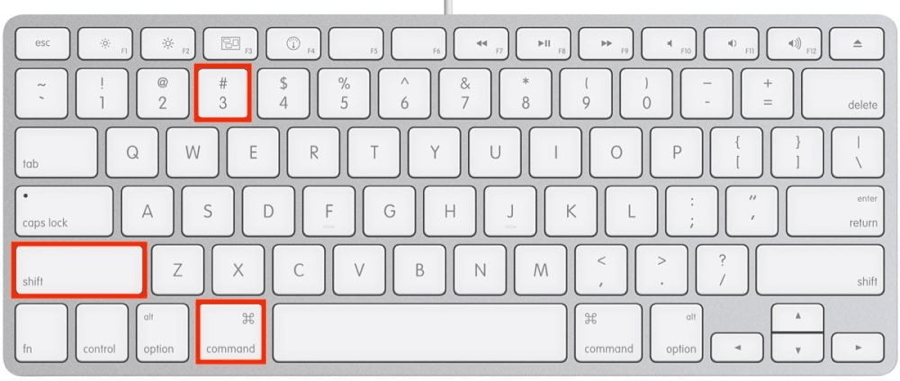
First, there is the Command-Shift-3 that captures a screenshot of your entire screen. This is when you need a right-away solution for your screenshot that temporarily uses the clipboard memory so that you can easily transfer it to any other document or file.
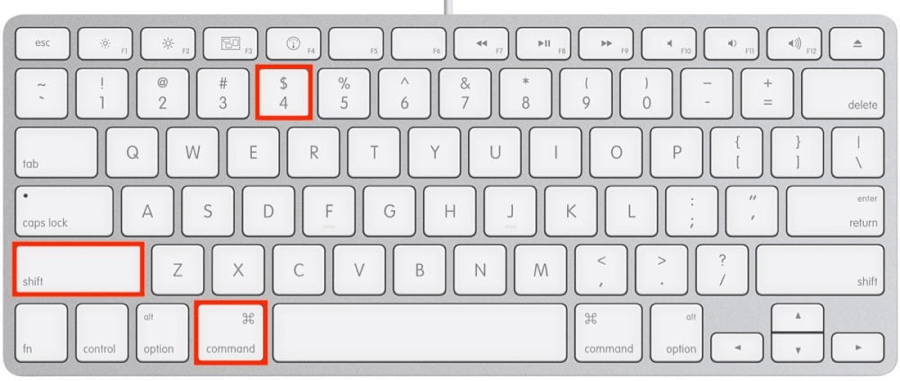
Then there is the Shift-Command-4 that turns your cursor into a crosshair which you can easily drag and select the exact portion of your screen that you want to be included in the screenshot.
If you release the mouse button or the track pad the screenshot is stored immediately and can be available to you upon request.
When you hit this command you also have some other useful options to follow. The first and most useful is the press and release the space bar button on the keyboard one of the famous shortcuts that people using Macs are happy to perform.
With this combination of keys you turn the crosshair into a little camera icon that you can move over any open window. Then by clicking on the specific window you can easily take a screenshot of it.
When you are getting a screenshot using that method you are receiving a white boarded window with a little bit of shadow inside making it visible that is about an inner window screenshot.
The other choice is to hold firmly down the space bar which gives you the opportunity to move the borders of the screenshot to meet the desired pixels.
This type of screenshot is extremely important when you want to shape a picture of multiple screenshots to be sent immediately to the recipient without having to send different files all the time.
Another option would be to Hold down the Shift key (after dragging to highlight an area but before releasing the mouse button or trackpad): This locks in each side of the selection area made with the crosshairs save the bottom edge, letting you move your mouse up or down to position the bottom edge.
Without releasing the mouse button, release the Shift key and hit it again to reposition the right edge of your selection area. You can toggle between moving the bottom edge and right edge by keeping the mouse button or touchpad engaged and pressing the Shift key.
Finally, the most important part of the screenshot ability in Mac would be the Shift-Command-5 that is used currently from all users worldwide. This function appears a small panel on the bottom of your actual screen with various screenshot options to follow. There are various of options including the screenshot of the whole screen as is, or a part of it or a selection of a special segment that can have text on it you would like to be communicated.
Screenshots are vital for your communication
When talking about screenshots these are parts of the various communication channels, we use across the internet to pass our information in a visible and more professional way. The Windows and Mac computers are always giving you the chance to capture your screenshots according to your special needs and desires.
Most of them require that you have a large clipboard memory. This type of memory creates a partition to the RAM memory inside your motherboard and can fit up to 1 GB of space in information needed to be copied from a single page. As a result there is plenty of room to get all the possible screenshots taken from your computer screen and be securely kept and copied when needed.
The Windows mobile versions have also shortcuts where you are using the device buttons to have immediate screenshots that are taken so that you can free your clipboard easier. This is due to the limited memory capacity of the modern cell phones and tablets that are in need of lighter materials and more space to fit data in than the desktop computers.
In other words, people want to use their mobile phones the same way they are using the computers as far as the screenshots are involved. This cannot happen to the fullest extent since the mobile phone memory is a lot weaker than the this of the desktop computers.
Get the most out of your screenshots
On the other hand, there is the Mac option that has taken the market by storm. People all around the globe are willing to give the extra money to acquire the Mac computers so that they can have better shortcuts to take screenshots any time they want simply and efficiently.
Lately the clipboard memory of Macs has been dramatically increased due to an internal renovation of the architecture of the Mac motherboard and RAM memory. This helps all users no matter if they are on a desktop Mac or using the iPhone or iPad to enjoy better screenshots.
They are always uploading quickly to the clipboard and can be later stored as files or be shared through the e-mail or social media. Or simply get into the Apple cloud where their eternal life is absolutely guaranteed.
The shortcuts on the Apple phones and tablets are reputable for their ease of use when needed. Any time you want to catch a screenshot on Apple mobile device you have to be ready to press a quick sequence of buttons located on the front panel and then your screenshot is ready to be stored at clipboard.
There is also a way to directly sent it to the cloud or the memory card of the device, but it is solely on your responsibility to make such adjustments to the factory settings.
Conclusion
All persons using computers and mobile devices are willing to take screenshots from time to time. Sometimes when other forms of communication are not providing any real progress the only solution remains the screenshot. It is clearly viewed and understood while it takes less room in the storage keepers than normal pictures grabbed by the cameras.
The screenshots give a clear message to the recipient of what you have exactly to express. You have to be extra careful about the safety of your sensitive information that may appear on the screenshot and have always in mind that other people will always be sneaking to your pictures to find hidden parts of yourself in there.
Screenshots are here to stay for long time with us since they are simple in use and can transmit information to people that otherwise could never be reached. Modern computing gives solutions for any possible problem. You are the one to choose how to use the screenshot technology for your clear benefit.
Also Read: