
Finding the right video editor for your YouTube videos may get overwhelming. Many people think that creating high-quality videos requires professional skill and comes with high costs. That’s a myth. The fact is you don’t need a degree in videography or hundreds of dollars to create great videos. What you need is to easily edit YouTube videos without all the headaches.
There are many video platforms in the marketplace that can get the job done without taking weeks to learn or emptying your wallet. When it comes to creating videos for YouTube you need an intuitive and affordable video editor that allows you to create amazing videos quickly. So we’ve narrowed it down for you and scoured the marketplace to find an editor that’s easy-to-use and affordable.
Select a video editor that can do it all.
It’s essential to find a video solution that makes it easy for you to upload to YouTube. Having a cohesive editing program that connects to your YouTube channel is important for creating video and sharing it with the world.
In addition, the video editor needs to have easy-to-use tools so you can jazz up your video within minutes. We turn to Screencast-O-Matic as our go-to video editor. Many of its users are educators, business professionals, and bloggers looking to create quick and easy videos to share on YouTube.
Screencast-O-Matic is known for its free screen recorder, which enables people to record their screen or webcam and turn them into shareable videos. As an upgrade, Screencast-O-Matic offers an affordable and intuitive video editor. It gives you the ability to add multimedia, transitions and also share your video to multiple social sharing websites including YouTube.
Look at editing in 3 parts.
Now that we’ve found a video editor let’s start with the simple process of editing. Editing can be seen in 3 parts:
- Prepare – collect all the footage, video or recordings from multiple sources.
- Produce – add multimedia, text, images and more!
- Publish – upload your videos to YouTube and other social sharing sites.
If you follow this process, editing your YouTube videos will be quick and easy. Below we’ve broken down the editing process and added all the bells and whistles to jazz up your video. Here are edit tips for YouTube videos and more tricks to optimize your video.
PREPARE: Collect all your footage, video or recordings
You have created or collected video from your phone, screen recordings on your computer or video footage from an online service. You’ve got multiple files to work with and now it’s time to put it all together.
One of the best tips we can provide is utilize a script or storyboard to help organize your video. Scripts are useful when you are creating tutorials or lessons that include narrated step-by-step instruction. Storyboards are great for a marketing or product video that includes major themes and often is created with music. This way you can organize your thoughts and the main points you want to communicate in each section. In the long run, you’ll notice you’ll save time and headaches having a method to structure your video before you start editing. Once you have collected your recordings and videos and structured your approach, you’re ready to start editing. Let’s show you how to get that done with Screencast-O-Matic.
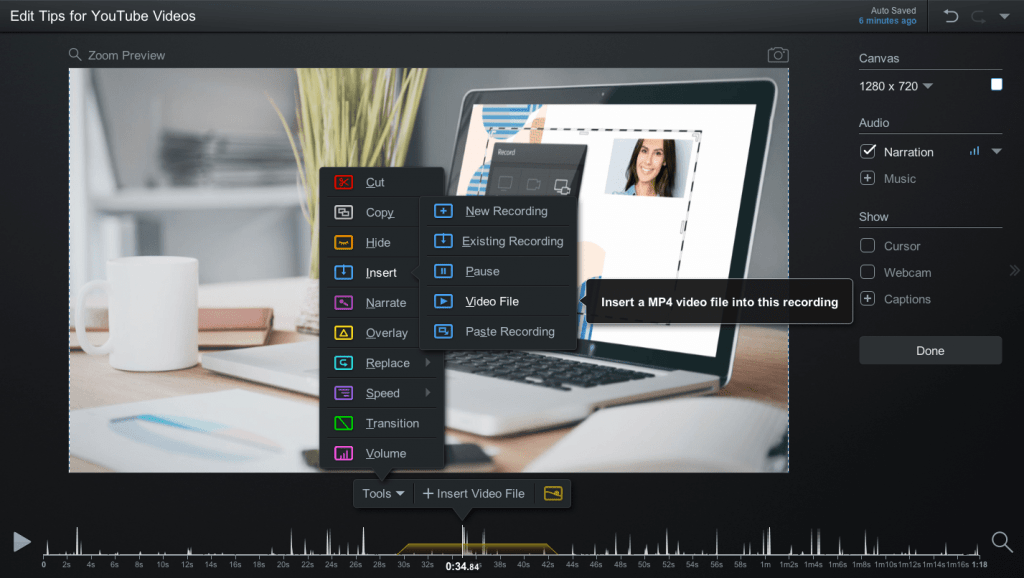
Combine videos and recordings from different sources
Have a video from your phone’s library you want to use? Did you create a recording previously that can be re-used and added into your video? No problem. It’s easy to import or copy and paste other videos and recordings you have made. You can incorporate all of this into your video timeline. Once you have mixed in all your content just edit and polish!
An easy way to insert a clip into a specific section of your video using Screencast-O-Matic’s video editor is to go to your timeline and head to the spot you want your video or recording to be placed. Go to the ‘Tools’ menu and click ‘Insert.’ You can click on a number of options depending on what type of media you have, or you can add a brand new recording that will open up your recorder.
Make standard cuts to your video
It may be easier to record your entire video without mistakes, but they do happen. An interruption or slip up in your speech or recording part of your desktop you don’t want in the video occurs more often than you think. Don’t start over! Keep going! You can delete your mistakes later.
Don’t worry about making further mistakes when editing. You can undo each edit easily, and there is a full edit history so you can go back to any point of your video to redo anything you’ve done.
Cut
Cutting involves deleting portions of your video. This can be done anytime throughout the editing process. From preparation to producing, cutting is a creative decision that you’ll be considering throughout your video. Screencast-O-Matic’s video editor has controls which enable you to do this easily. Seek on the timeline to the start of the section you want to cut. Click on the tools menu and choose ‘Cut.’ A red span will appear, and all you need to do is drag and drop it into place. Hit ‘Ok,’ and it will delete anything that was in the red span.
With your initial cuts now complete, we can turn to the next step of the process: Adding the jazz to enhance your videos.
PRODUCE: Enhance the video by adding text, images and more!

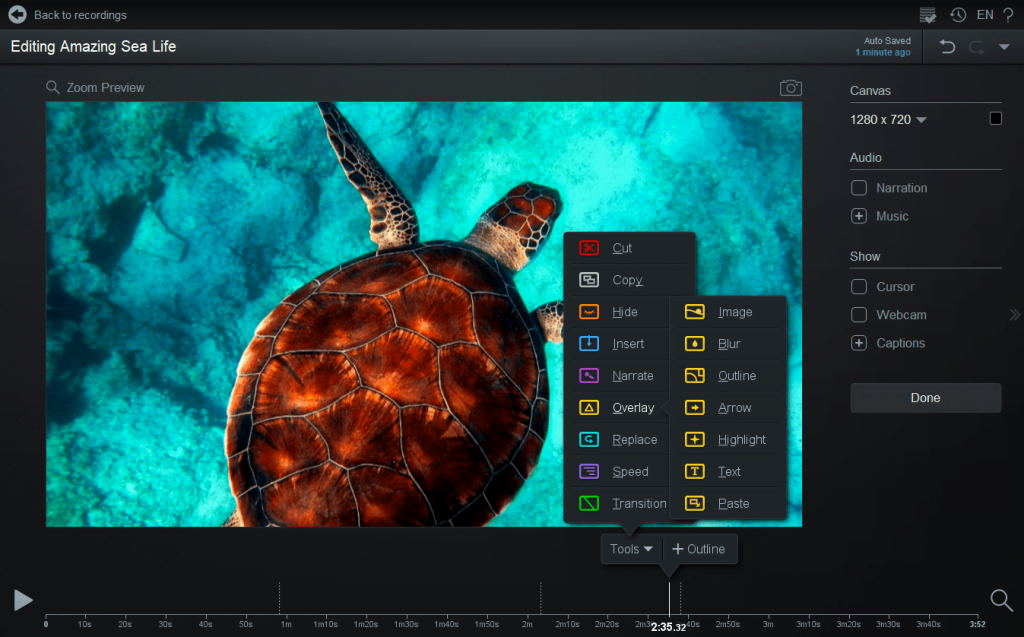
Producing your video and adding the jazz is easy with Screencast-O-Matic. There are a number of overlay options that will help you enhance your video. From adding images, text, arrows to outlines, all of these can make a rather dull video into an engaging one. Let’s explore a few of Screencast-O-Matic’s overlay options:
Adding images
If you are looking to add pictures to your video, you can easily add them to any part of your video using Screencast-O-Matic’s video editor. Head to the spot on your timeline where you want your picture to appear. Click on the tools menu and go to ‘Overlay.’ You’ll see a list of options. Click on Image.
A pop up of your computer’s menu will open. Find the image you want to use and add it to your timeline. Once you do this, a blue span will appear on your timeline. You can adjust the picture by dragging the dotted lines or use the settings menu to define the styles of your image. You can control the length of time your picture appears just by dragging the blue span. Once you’re done, click ‘OK’ and a yellow span will appear showing that the image is on your timeline. You can adjust your picture at any time by clicking on the image icon.
Text and shapes to emphasize points
If you’re creating an instructional video or a tutorial, adding text and shapes can help emphasize points throughout your video. Screencast-O-Matic makes it very easy to create and format text and place it anyway over your video. You can also use circles, squares and other shapes to draw attention to specific areas of your video.
To get started with text, head to the area you want the text to appear then go to your tools menu and click on Overlay. Head to ‘Text,’ and a text box and menu will appear. You can choose different colors and fonts for your text in the menu. You can also adjust the size of your text by dragging the box.
For shapes or outlines, you can click on ‘Outline’ within the choices of the ‘Overlay’ menu. You can choose the shape, color, and thickness.
The point with an arrow
Adding arrows can be great when you are looking to point to things on your video.
Head to the timeline where you want the arrow to appear and go to your tools menu. Click on ‘Overlay’ then ‘Arrow.’ An arrow will appear alongside a menu to customize it. You can create any type of arrow you want by adjusting the size, color or thickness. You can even add a shadow to the arrow. To change the length of time you need to show the arrow, head down to your timeline and click and drag the blue span. The arrow will fade in and out.
Use animations to generate excitement
Transitions
Transitions are great to use when you need to segue into a new topic or thought. It’s also helpful to use when you are showing a piece of video and you need to fade it into another piece.
One tip is to pick one or two different transitions to use throughout your video. Using too many may confuse your audience with the video’s overall message.
You can find a list of transitions on Screencast-O-Matic’s video editor. Go to the section of your video where you want to add a transition. Click on ‘Transition’ then ‘Type,’ and a list of available transitions will appear. You can adjust the length of time you want your transition to appear. Then hit ‘Ok.’
Adding motion to your overlays
You can add movement to overlays to direct the viewer’s eyes. One example is if you wanted to point an arrow to different places on your video. Not only can you add movement but you have other options including speed. You can adjust the speed up or down to match up the action.
Here’s how to get started. Head to the overlay you want to move. There will be a ‘+O’ located above the line. Click on ‘+O,’ and it will generate a point on where to start your motion. Move the object to where you want it to move to and adjust the speed. Hit ‘Ok’ when you’re done. That’s it!
Add sound to engage your audience
Add computer sound and narration
You can add and edit multiple tracks of audio including computer sound and narration. You can do this for the entire video or a specific section. For example, you can easily narrate your video and if you don’t like your voice have a colleague or voiceover service create a WAV file and import that file to replace your narration.
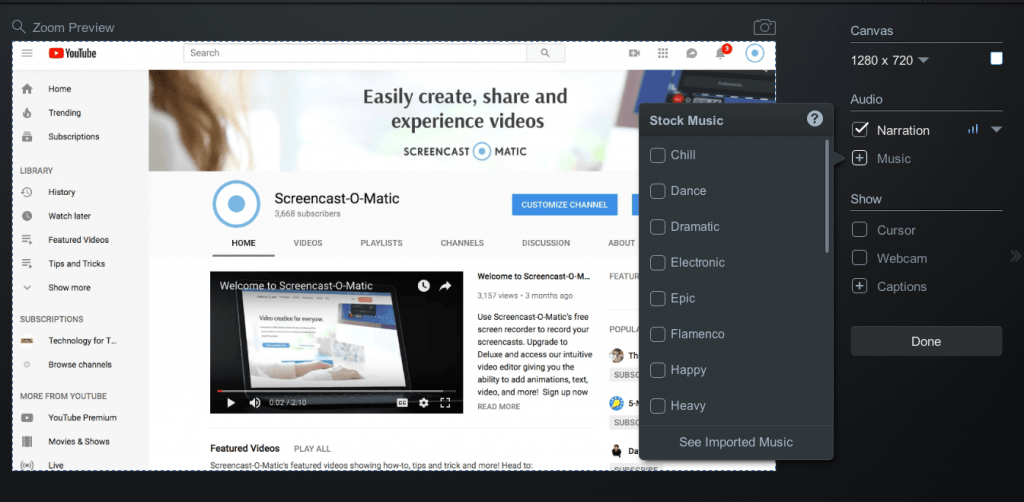
Music to liven the mood
Music can help liven and enhance the tone of your video. Choose from the music library or import your own track. You’ll find stock music with different types of tracks from pop rock to happy to inspirational. It really depends on the type of video you have. If you have your own music and want to showcase that, Screencast-O-Matic gives you the ability to upload your own song in an MP3 or WAV format. All you need to do is go back to that music menu and click on ‘Import Music.’ It’s that easy!
Add music by going to ‘Music’ and hitting the ‘+’ button on the right-hand side of your editing platform. If you’re looking to explore the music, you can click on the ‘play’ icon to hear it before selecting the song.
There is so much more to add! We suggest exploring the tools or head to their ‘Video Tutorials’ page to get insight on every feature. You can also find videos on Screencast-O-Matic’s YouTube channel. The possibilities are endless!
PUBLISH: Upload your video to YouTube
After you have your video polished and everything looks good to go, you can start publishing your video to YouTube. Click ‘Done’ to get started with YouTube.
Connect YouTube Account
There are two ways to get your video on YouTube. The easiest way is through Screencast-O-Matic’s video platform.
First, you’ll have to connect your YouTube account. To connect, click on ‘+’ next to the ‘Options’ menu.
Click ‘Upload to YouTube’ and a pop-up will appear, click ‘Launch web browser.’ Choose your account and ‘Allow’ Screencast-O-Matic to have access to your YouTube Google Account. When this process is done, you can easily click on ‘Upload to YouTube,’ and it will directly publish your videos.
Fill out the necessary information for the upload. We recommend that you add a title, description, and tags to optimize your video. Also, make sure to double-check your privacy and other settings in the menu.
Save as a video file
Another way to upload your video to YouTube is saving your video file. YouTube recognizes several file formats for upload. In this case, Screencast-O-Matic enables you to save your file as an MP4, FLV and AVI formats; all of which, YouTube accepts.
To save your file, click on ‘Save as Video File.’ Fill out the menu and choose ‘type,’ filename, folder and quality of your video. Click on ‘Publish’ when you are done. It will save your video file to a folder on your computer.
When this is done, you can head to your YouTube channel and click on the ‘upload’ icon located on the top right of the screen. If you have multiple videos, this is a great way to get those published all at once.
Select the files you want to upload and YouTube will process all of your videos.
Add the title, description, and tags associated with this video and click ‘Done’ when it’s done the processing.
Quick Tips for YouTube
Now that it’s all done, here are a few quick tips to optimize your YouTube video so it’s getting the best traction.
Optimize the title and description
Optimizing your title and description is key to getting people to find your video. Use a keyword in your title and description. In addition, adding links to your description will help others find your other content.
Choose a thumbnail
Picking the right thumbnail is extremely important. Use an engaging image to attract people to your video. It’s usually the first visual people see when searching YouTube. You can choose your own custom thumbnail while your video is uploading or choose from the randomly selected images YouTube generates.
Add annotations and cards
Annotations and cards are clickable links that overlay on your video. Click on either the Annotations or Cards button at the top of the YouTube video menu to add them. You can add a speech bubble annotation at the beginning and end of your videos that links to your YouTube channel and ask people to subscribe to your channel. You can also add ‘cards’ that link to websites throughout your video.
Editing videos doesn’t have to be hard. It can be fun and easy! You just need to find the right video editor that can do it all. Explore Screencast-O-Matic and all of its tools.
You’ll find YouTube success in no time with Screencast-O-Matic!