
Transferring photos from iPhone to the computer is not that easy and everyone can’t do it. There are so many iPhone users who want to transfer pictures to a computer but don’t know how to do it. So, if you have the same question running on your mind then do not worry as we are here to help you out. Many of you don’t know how to transfer pictures from iPhone to computers, so check out the whole article and get your work done instantly.
One of the easiest and safe way to keep your library safe is iCloud Photos. On iCloud Photos, you can never miss any of your pictures even if you lose your device. To Transfer your photos and videos from iPhone you can use iTunes. So we are going to discuss on how to transfer photos and videos from iPhone to the computer by using iTunes. We will also show you how to transfer pictures without using iTunes.
All the iPhone lovers, do not worry as we have brought the solution to your problem. Go through the full post and transfer your photos and videos to computer with the help of iTunes.
Before you start doing this process, remember the following things:
- Update your iPhone to the latest version of iOS.
- Make sure you are signed in to your icloud with your Apple ID
- Set Up icloud on all the devices
- Check out your Internet Connection
Now, before you start transferring, first Turn on iCloud Photos on your iPhone.
How to Turn On iCloud Photos on iPhone?
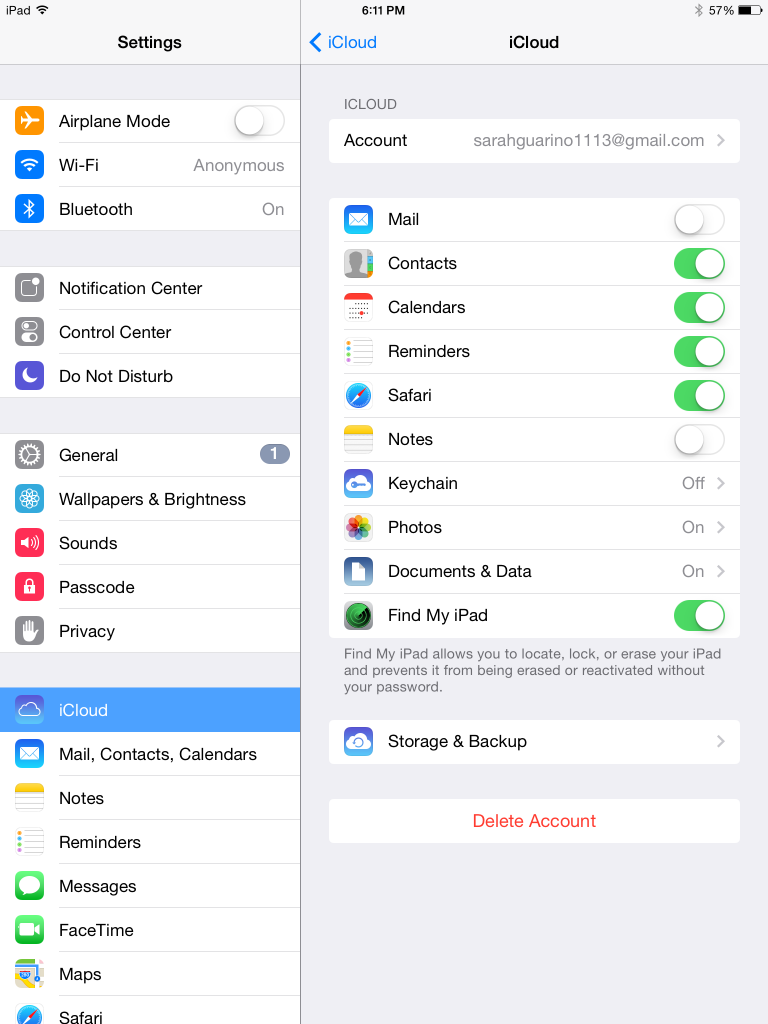
- First, go to settings on your iPhone
- Then your name followed by iCloud> Photos, then turn on iCloud Photos.
Method 1: How to Transfer Photos from iPhone to Computer with iTunes?
Use iTunes to transfer your pictures and videos from iPhone to Computer. Follow the given steps to transfer photos with iTunes.
Also Read:
Set up iTunes to transfer photos to your iPhone, iPad, iPod touch from Photos App or from a computer. Every time when you Sync your iOS device with iTunes, pictures, and videos on your iOS gets updated to match the albums on the computer. So, if you want to transfer your photos from iPhone, iPad, or iPad to your computer follow the steps:
- The first thing you must keep in mind is, you have the latest version of iTunes on your computer.
- Open the iTunes app on your computer
- Then connect your iPhone with the help of USB cable to your computer
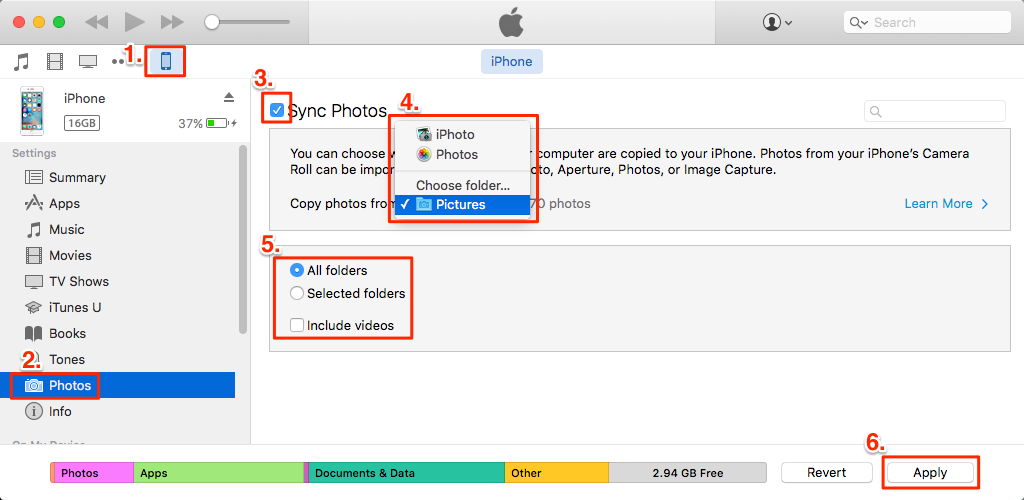
- In iTunes click on the device icon which is placed under the volume key and besides the Music.
- Then on the left-hand side click on Photos
- Now, click on the box which is next to “Sync Photos” OR If you see “iCloud Photos is On” then all your photos and videos are already there on your devices which use iCloud photos. So, you don’t need to sync them with iTunes.
- Choose the folder which you want to sync from.
- Then choose all photos and albums option to sync
- If you want to sync videos also then select “Include videos from the app or folder”
- Click on APPLY
That’s it! You are done!! Follow these steps to transfer your photos from iPhone to Computer with the help of iTunes.
Method 2: Transfer Photos from iPhone to Windows or Mac Computer with iTunes
Many of you ask that, Can you transfer photos from iPhone to Computer Via Bluetooth? But no there are many other ways by which you can transfer photos from your iPhone. iTunes lets you to sync photos between the iPhone and the Computers Mac, and PC. If you want to know how to transfer photos to Laptop using iTunes then follow the given steps and start transferring your photos.
NOTE: Update your iTunes to the latest version.
Steps to transfer photos from iPhone to the computer using iTunes.
- Step 1: First of all connect your iPhone to the computer with a USB Cable and launch iTunes
- Step 2: Then click on the iPhone’s device icon which is on the left bar of the interface.
- Third step: Click on Back Up now and start backing up your device.
All the photos of yours will be backed up on iTunes. The backup file of iTunes is located in C:\Users\username\AppData\Roaming\Apple Computer\MobileSync\Backup.
Keep in mind that the photos are backup files which you can’t read directly until you resort the third-party iTunes backup extractor.
Also Read:
- Best And Cheap Sonos Alternatives
- 14 Best Writing Apps for Mac
- 12 Best Free Password Apps For iPhone
Best Ways To Get Photos from iPhone to Computer
1. Use USB Connection
Using USB Cable also can transfer your photos to your PC or Mac. On Mac, you can transfer photos directly using the photos app. And on Windows, you can use Windows File Explorer or AutoPlay feature.
If you are a Windows users then follow the steps:
Use Windows File Explorer and transfer photos:
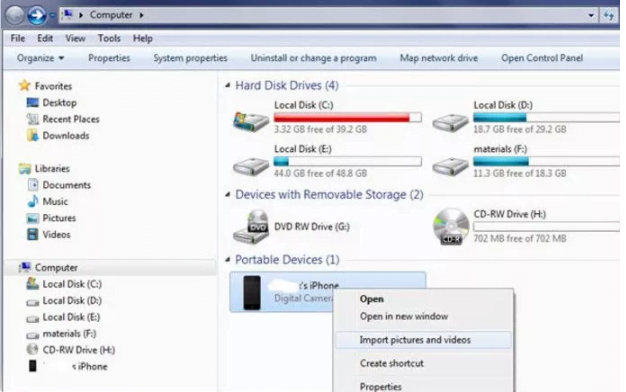
- First, connect your iPhone to your computer with USB Cable
- Press Win+ E on the keyboard and find your iPhone under This PC or My Computer
- Do right click on your iPhone and select Import pictures and videos.
Use AutoPlay and transfer photos. Follow the steps given below.
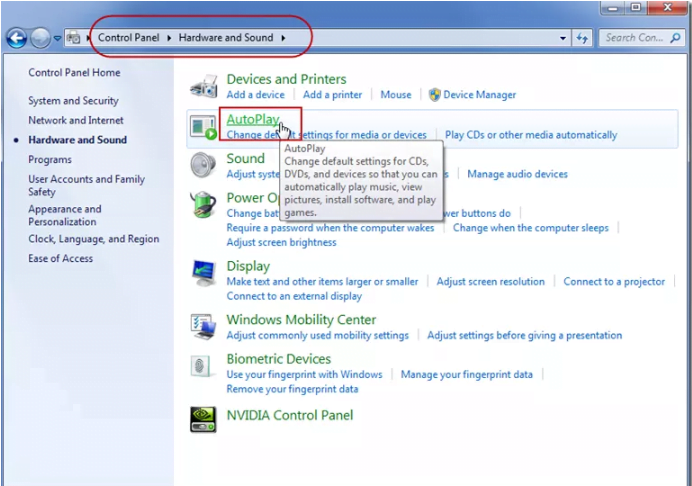
- First Enable AutoPlay. Click on Start Button then Control Panel > Hardware and Sound > AutoPlay.
- In Windows Checkbox, check “Use AutoPlay for all media and devices”. It is at the top left corner
- Now, connect your phone to computer by USB Cable and launch the camera on your iPhone.
- Automatically, the AutoPlay dialog box will be seen. There click on Import pictures and videos by using the Windows option.
- Select photos which you want to import and then click on import.
For Mac users:
If you want to transfer photos on Mac then follow the given steps. Use Photos App and transfer photos.
- First, connect your iPhone via USB Cable to your Mac. (Make sure our device is unlocked with your passcode. Then click on Trust when prompted.)
- Launch the Photos App if it does not open automatically.
- In the Photos App tab, click on Import located which is at the top
- Select the photos which you want to import and then click on import.
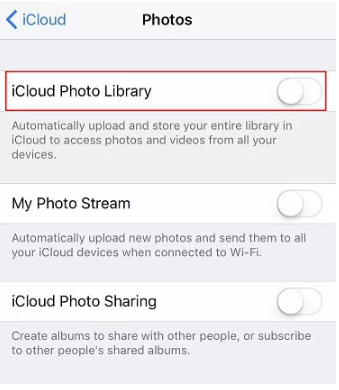
2. Use iCloud Photo Library
If you want to use iCloud Photo Library then you need to enable it on your iPhone then download it on the computer. Follow the given steps and use iCloud Photo Library to transfer photos.
- First, go to settings > Photos and Camera and then click on iCloud Photo Library button to enable iCloud Photo Library
- Now, on Windows, download iCloud for Windows and install and run it. If you are having Mac, then directly launch iCloud
- Then Sign In to iCloud by using the Apple ID which you used to set up iCloud on iPhone.
- Click on options and check the photo Library checkbox plus any options like My Photo Stream, iCloud Photo Sharing etc. Then click on Done. All your pictures will be synced to the computer.
All the synced photos are stored in the iCloud photo under favorites which can be used by using File Explorer.
If you are using Mac then your Photos will automatically come in Photos App.
CONCLUSION:
So, these are the few methods by which you can transfer your photos from iPhone to your computer. We have shown you how you can use iTunes to transfer photos and also transfer photos without iTunes. There are so many users who don’t know how to transfer photos from iPhone. So these are a few methods which you must try. Hope this article helped you. If you know any other easy way to transfer photos from iPhone to computer then do share it with us. Stay tuned for more.
Also Read: