
In iPhone, we can take high-quality pictures as it has the best camera. Even in the new iPhone XS has a 12MP camera and its portrait mode, most of them really like taking pictures in iPhone. Apart from taking pictures on iPhone, it also saves images in Safari and a Mail. All the photos are stored in Phone and your storage is getting high. Now, what can you do? You must transfer all your pictures to your laptop or a computer. If you don’t know how to transfer photos then you have come to the right place. Here we will show all the ways by which you can transfer photos from iPhone to the computer without using iTunes.
USB Cable Or Wireless Transfer?
Before transferring photos, you need to decide whether you want to transfer pictures with a cable or without a cable (Wireless). If you use a cable, you need to connect your iPhone to a computer by Lighting Cable. The cable is which you use to charge your iPhone.
If you want to transfer it wirelessly, then transfer the images using iCloud Photo Library or AirDrop.
How to Transfer Photos from iPhone to PC Without iTunes.

Method 1: Using iCloud
You can use iCloud for transferring photos and videos to the computer. If you don’t have a USB cable then sync photos from iPhone to the computer with Apple iCloud service. There are two ways by which you can transfer your pictures via iCloud. It depends on which iCloud you have downloaded whether it is for Windows then follow the steps.
First, on your iPhone Go To SETTINGS > Your Name> iCloud >Photos and then turn on the iCloud Photo Library on the phone. Now, follow the given steps to transfer photos to your PC.
Sync photos from iPhone to a Computer via iCloud Control Panel
- First run iCloud for Windows on PC
- Then Click on OPTIONS which is next to PHOTOS.
- Now, enable iCloud Photo Library.
- Turn on the Download New Photos and Videos to my PC. (If you want to store your iPhone photos somewhere else then click on CHANGE under the option and set your storage path.
- Make sure you are connected to Wifi, your photos from iPhone will be copied to your PC.
![]()
Transfer iPhone photos to a computer via iCloud.com
- Visit iCloud.com in your computer
- Enter your Apple ID and sign in to iCloud. ( Same time you must be signed in to iCloud on your device also with same Apple ID)
- From the options Choose PHOTOS.
- Select photos which you like to download from iCloud to PC.
- Click on Download selected Item which is at the top right corner.
Also Read:
Method 2: Transfer Photos from iPhone to PC via Email
It is very easy to transfer your photos and videos from iPhone to your computer. One of the best and easy way is to send an email from your photos to your computer. You can send an email of photos and then open the email on the computer and download all the photos. Follow the given steps to know how to do it.
- On your iPhone go to PHOTOS app
- Choose the album of photos and select those pictures which you want to transfer to your computer
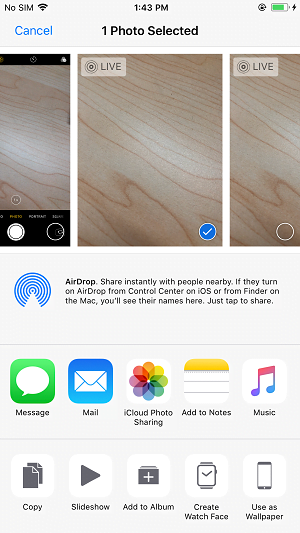
- Click on the Share button and then choose Mail option to send
- Enter the information and click on SEND.
- Now, check the email on the computer and download all the photos to your computer.
Method 3: Using Dropbox
Using Dropbox, you can easily transfer your pictures from iPhone to your computer via LAN. Follow the steps to use Dropbox for transferring photos to the computer.
- First of all install Dropbox app on your iPhone
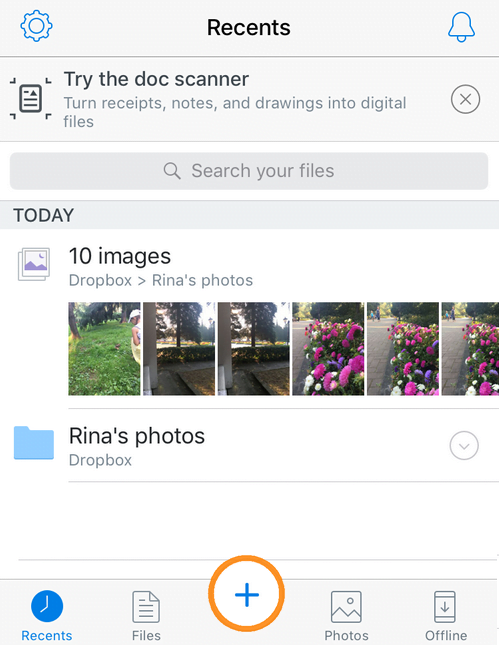
- Start the app and click on Plus Symbol which is at the bottom of the screen
- Then upload photos
- Choose photos or select them by moments
- Now add them to the Dropbox.
- Then you must install Dropbox on your computer also
- Open the Dropbox folder which you created from your iPhone
- You can see all your iPhone photos there
- Now, move all the pictures from your Dropbox to your computer.
Transfer Photos from iPhone to PC with AnyTrans for iOS
There are many ways by which you can transfer photos to a computer, but most of them helps you to transfer only Camera photos. So, we recommend you a manager tool AnyTrans for iOS, which does a great task in managing and transferring photos to a computer.
![]()
Features of AnyTrans iOS:
- It can transfer all types of iPhone photos.
- Supports importing camera Roll Photos, Photo Stream, Photo Library, iCloud Sharing Photos, Photo Albums, etc.
- All the photos are stored like Camera Roll, Panoramas, Live Photos, ScreenShots, Selfies, Bursts, etc. All are in a different folder so easily you can find the picture you want.
- The transferring speed is very fast. It can transfer 1500+ photos in 3 minutes.
- It copies the original photos to the computer
- Very easy to use
- Can be used with all iPhone models and computer Operating System.
Now, let us see how to import photos from iPhone to Windows computer by using AnyTrans. Follow the given methods.
Method 1: Click to Export All Photos from iPhone to Windows (7/8/10) Computer
- First, you need to download AnyTrans for iOS on your Windows and then install it and run it.
- Launch the app and then connect your iPhone to the computer with USB Cable.
- Click on CONTENT TO COMPUTER on the homepage of AnyTrans for iOS.
- Now, select the photos categories which you want to export to PC like Photo Stream, Camera Roll, Photo Video, Photo Library, Live Photos, Screenshot, etc. By clicking the Select Button pick the output folder and click the Right arrow button to start transferring photos from iPhone.
- When the process is over, all the photos will be exported from iPhone and will be saved on your computer. All the photos will be organized in folders like Camera Roll, Panoramas, etc.
Method 2: Transfer Multiple or Selected Photos from iPhone to Windows (7/8/10) Computer
- First, download AnyTrans for iOS on your PC computer, install and run it.
- Connect your iPhone to the computer with USB Cable and then Click
 button.
 - Then Select PHOTOS > select the album with photos which you want to transfer, like Photo Stream, Camera Roll, Photo Share, Photo Library, Location, etc.
- Select the photos you want to transfer and then click TO Computer button to get those photos on your computer.
Method 3: Windows AutoPlay Options
On Windows 7 there is no Photos App on the Computer. But you can use the other option AutoPlay to transfer your photos from iPhone. This method can be used on Windows 8.1 and 10 machines if you can’t use the Photos App.
- Just connect your iPhone to your computer with the USB cable.
- Then maybe your device will ask if it’s Okay to trust the computer.
- Click on TRUST and enter your password to unlock the phone.
- When your iPhone is connected, the AutoPlay window appears on your computer
On the screen you will see it will offer several options:
![]()
To import the new photos just click on Import Photos and Videos. Windows will detect the pictures on your device and then it imports them in a folder in the pictures library.
The folder will be named with the date you imported the photos. It won’t transfer the duplicate photos which you already have copied to your PC.
Method 4: Windows Photos App
The Photos App on Windows 8.1 and Windows 10 gives you an easy way to transfer photos from iPhone to PC. In this method, you need to connect your phone to the computer with USB cable. Before transferring the pictures, make sure you have the latest version of iTunes on your computer.
- Must connect your iPhone to your computer with USB cable.
- Unlock your device with the password.
- It will ask you to Trust this Computer.
- Click on Trust or Allow to continue.
- Then open Photos App on your computer and select IMPORT.
- Select the device which you want to import images from
- Choose the photos which you want to import and then click on CONTINUE
Windows will save the photos in the Picture Library. If you wish you can change the location. And when you are ready to Import click on IMPORT.
How To Transfer Photos From iphone to mac
Here we will also explain you on how to transfer photos from iPhone to MAC. You can use Photos App or Image capture app to transfer pictures by using USB Cable. And there is an option of Wirelessly transfer also by using an iCloud method and AirDrop method.
Let us check out few methods on transferring pictures from iPhone to Mac.
Also Read:
- 8 Free and Paid Automatic Time Tracking Software For mac 2018
- Craigslist Posting Software Free Download For Mac & Window
- 11 Best Free Macro Recorders For Windows , Mac Huge List
Method 1: iCloud Photo Library On Mac
iCloud Photo Library makes smooth transferring images from iPhone to Mac. Enable the iCloud Photo Library and the Photos App on your Mac will sync with the Photos App on your iPhone. Then automatically when you take new pictures will be downloaded to the Photos App on your Mac.
Here, learn how to download photos from iPhone to Mac by iCloud Photo Library.
- If you want to Sync Photos Apps on your iPhone and Mac, first enable the iCloud Photo Library on both the devices.
- In the iPhone, go to SETTINGS > Your name > iCloud > Photos.
- Then switch on iCloud Photo Library to get your Photos stored in iCloud.
And on your Mac, go to SYSTEM PREFERENCES > iCloud.
Then Select Photos checkbox, and click Options which is next to photos.
![]()
Now, select the iCloud Photo Library and then click on DONE.
At first, when you switch on iCloud Photo Library you need to wait for few seconds for the photos to get sync between the iPhone and Mac.
When the devices are synced, the Photos App on your Mac will show the same collection of photos which are there on your iPhone.
The Photos App on Mac is same as the Photos App on your iPhone. Even it is organized in the same way as on your iPhone. Like, if you organize photos in Albums on your iPhone, that same album will be seen on your Mac.
And if you delete photos from the Photos App on your iPhone then it will delete those photos from the Mac also. And if you delete the photos from Mac it will automatically gets deleted from iPhone.
To delete pictures from iPhone, but you want to keep it on your computer, you need to export them on your Hard drive. First, open the Photos App on your Mac and select the images which you want to export.
Then click on FILE > EXPORT > EXPORT PHOTOS.
Select the pictures and click on EXPORT. Now, choose the folder which you want to export.
CONCLUSION
So, these are the best options to transfer photos and videos from iPhone to the Computer without using iTunes. You can transfer all your photos from iPhone, iPad to computer. These methods will really help you if you don’t know how to transfer photos from iPhone to your Mac or Computer. All of the methods are very easy and we have explained it very clearly so that you can understand properly.
We hope this article is helpful for you. Stay tuned for more updates.
Also Read:
- 10 Best File Managers for Android Free Download in 2018
- Nokia Upcoming Android Phones and Flagship Models of 2018
- 15 Best Android Phone Under Rs.11000 You Must Check Out Now @
- Best Phones Under 30000 With Best Camera Quality in 2017
- Top 10 Best Android Smart Phone Under 14000 Till Date
- Best Android Phone Under 8000 Rupees Best Smartphone Till Now